0%

树莓派折腾记录

使用树莓派的一些记录

网络 WiFi 问题

使用的 Zero W,没有网口。所以在不使用图形界面的时候,需要在命令行配置网络

1
vim /etc/wpa_supplicant/wpa_supplicant.conf

ssid 是 WiFi 名称,psk 是密码,priority 是优先级,数字越大优先级越高。有些低版本的树莓派,只能连接 2.4G 的 Wifi。

1
2
3
4
5
6
7
8
9
10
country=US
ctrl_interface=DIR=/var/run/wpa_supplicant GROUP=netdev
update_config=1

network={
ssid="ABC"
psk="password"
key_mgmt=WPA-PSK
priority=9
}

WiFi 重启命令

1
ip link set wlan0 down && ip link set wlan up

fbterm 字体问题

1
vim ~/.fbtermrc
1
2
font-names=mono
font-size=12

https://bbs.deepin.org/post/230435

获取小米温湿度计的数据

需求

小米温湿度计用米家连接速度慢,且获取间隔为 1 小时一次,感觉有点慢,想要手动保存这些数据。

本来是想使用 HomeAssistant 来完成的,但发现 Python 版本要求 3.8 以上,而树莓派上的 Python 版本是 3.7。且就这一个设备,感觉没必要那么复杂。

好在已经有成熟的开源项目实现这一功能,https://github.com/JsBergbau/MiTemperature2。使用起来也很简单

准备

安装蓝牙驱动

1
2
3
# 可以先输入 bluetoothctl 看看是否可以进入蓝牙交互界面,如果可以则无需安装
sudo apt update -y && sudo apt upgrade -y
sudo apt install bluetooth pi-bluetooth bluez blueman mplayer -y

python 安装依赖

1
pip3 install bluepy

获取设备信息

1
2
3
4
5
# 进入蓝牙交互界面
bluetoothctl

# 扫描附件的蓝牙设备
scan on

会持续扫描附近蓝牙设备,需要关注一个叫做 LYWSD03MMC 的设备(在设备后面有型号),这个就是小米温湿度计。

1
2
3
...
[NEW] Device AA:BB:CC:DD:EE:FF LYWSD03MMC
...

记录这个设备的 MAC 地址,退出蓝牙交互界面

1
exit

实现

原来的代码过于复杂,还涉及一些其他的功能。核心功能是,获取温湿度信息即可。因此,我对代码进行了简化。在外面套一个定时任务即可。

把 MAC 地址写到下面的脚本中,然后运行脚本,就可以获取到温湿度信息了。

# coding: utf-8
# Simplify from https://github.com/JsBergbau/MiTemperature2/blob/master/LYWSD03MMC.py
import argparse
import json
import logging
import math
import os
import re
import threading
import time
import traceback
from dataclasses import dataclass
from datetime import datetime
from bluepy import btle
device_mac = ... # 填 MAC 地址
mode = "round"
@dataclass
class Measurement:
temperature: float
humidity: int
voltage: float
calibratedHumidity: int = 0
battery: int = 0
timestamp: int = 0
sensorname: str = ""
rssi: int = 0
def __eq__(self, other): # rssi may be different, so exclude it from comparison
if (
self.temperature == other.temperature
and self.humidity == other.humidity
and self.calibratedHumidity == other.calibratedHumidity
and self.battery == other.battery
and self.sensorname == other.sensorname
):
# in passive mode also exclude voltage as it changes often due to frequent measurements
return self.voltage == other.voltage
else:
return False
def watchDog_Thread(exit_event):
global unconnectedTime
global connected
global pid
while not exit_event.is_set():
logging.debug("watchdog_Thread")
logging.debug("unconnectedTime : " + str(unconnectedTime))
logging.debug("connected : " + str(connected))
logging.debug("pid : " + str(pid))
now = int(time.time())
if (unconnectedTime is not None) and (
(now - unconnectedTime) > 60
): # could also check connected is False, but this is more fault proof
pstree = os.popen(
"pstree -p " + str(pid)
).read() # we want to kill only bluepy from our own process tree, because other python scripts have there own bluepy-helper process
logging.debug("PSTree: " + pstree)
try:
bluepypid = re.findall(r"bluepy-helper\((.*)\)", pstree)[0] # Store the bluepypid, to kill it later
except IndexError: # Should not happen since we're now connected
logging.debug("Couldn't find pid of bluepy-helper")
os.system("kill " + bluepypid)
logging.debug("Killed bluepy with pid: " + str(bluepypid))
unconnectedTime = now # reset unconnectedTime to prevent multiple killings in a row
# time.sleep(5)
exit_event.wait(timeout=5)
class MyDelegate(btle.DefaultDelegate):
def __init__(self, params):
btle.DefaultDelegate.__init__(self)
# ... initialise here
def handleNotification(self, cHandle, data):
global measurement
try:
measurement = Measurement(0, 0, 0, 0, 0, 0, 0, 0)
measurement.timestamp = int(time.time())
temp = int.from_bytes(data[0:2], byteorder="little", signed=True) / 100
# print("Temp received: " + str(temp))
if args.round:
# print("Temperature unrounded: " + str(temp))
if args.debounce:
global mode
temp *= 10
intpart = math.floor(temp)
fracpart = round(temp - intpart, 1)
# print("Fracpart: " + str(fracpart))
if fracpart >= 0.7:
mode = "ceil"
elif fracpart <= 0.2: # either 0.8 and 0.3 or 0.7 and 0.2 for best even distribution
mode = "trunc"
# print("Modus: " + mode)
if mode == "trunc": # only a few times
temp = math.trunc(temp)
elif mode == "ceil":
temp = math.ceil(temp)
else:
temp = round(temp, 0)
temp /= 10.0
# print("Debounced temp: " + str(temp))
else:
temp = round(temp, 1)
humidity = int.from_bytes(data[2:3], byteorder="little")
voltage = int.from_bytes(data[3:5], byteorder="little") / 1000.0
measurement.temperature = temp
measurement.humidity = humidity
measurement.voltage = voltage
batteryLevel = min(int(round((voltage - 2.1), 2) * 100), 100) # 3.1 or above --> 100% 2.1 --> 0 %
measurement.battery = batteryLevel
except Exception as e:
print("Fehler")
print(e)
print(traceback.format_exc())
def connect():
# print("Interface: " + str(args.interface))
p = btle.Peripheral(adress, iface=args.interface)
val = b"\x01\x00"
p.writeCharacteristic(0x0038, val, True) # enable notifications of Temperature, Humidity and Battery voltage
p.writeCharacteristic(0x0046, b"\xf4\x01\x00", True)
p.withDelegate(MyDelegate("abc"))
return p
# Main loop --------
parser = argparse.ArgumentParser(allow_abbrev=False)
parser.add_argument(
"--device", "-d", help="Set the device MAC-Address in format AA:BB:CC:DD:EE:FF", metavar="AA:BB:CC:DD:EE:FF"
)
parser.add_argument(
"--interface", "-i", help="Specifiy the interface number to use, e.g. 1 for hci1", metavar="N", type=int, default=0
)
parser.add_argument("--mqttconfigfile", "-mcf", help="specify a configurationfile for MQTT-Broker")
rounding = parser.add_argument_group("Rounding and debouncing")
rounding.add_argument(
"--round",
"-r",
help="Round temperature to one decimal place (and in passive mode humidity to whole numbers)",
action="store_true",
)
rounding.add_argument(
"--debounce",
"-deb",
help="Enable this option to get more stable temperature values, requires -r option",
action="store_true",
)
args = parser.parse_args()
args.device = device_mac
if args.device:
if re.match("[0-9a-fA-F]{2}([:]?)[0-9a-fA-F]{2}(\\1[0-9a-fA-F]{2}){4}$", args.device):
adress = args.device
else:
print("Please specify device MAC address in format AA:BB:CC:DD:EE:FF")
os._exit(1)
if __name__ == "__main__":
p = btle.Peripheral()
connected = False
logging.basicConfig(level=logging.ERROR)
logging.debug("Debug: Starting script...")
pid = os.getpid()
bluepypid = None
unconnectedTime = None
connectionLostCounter = 0
exit_event = threading.Event()
watchdogThread = threading.Thread(target=watchDog_Thread, args=(exit_event,))
watchdogThread.start()
logging.debug("watchdogThread started")
flag = False
while not exit_event.is_set():
if connectionLostCounter >= 5:
logging.debug("connectionLostCounter >= 5")
exit_event.set()
continue
try:
if not connected:
print("Trying to connect to " + adress)
p = connect()
connected = True
unconnectedTime = None
if p.waitForNotifications(2000):
flag = True
except Exception as e:
print("Connection lost")
connectionLostCounter += 1
if connected is True: # First connection abort after connected
unconnectedTime = int(time.time())
connected = False
time.sleep(1)
logging.debug(e)
logging.debug(traceback.format_exc())
# Perhaps do something else here
if flag:
data = {
"Temperature": measurement.temperature,
"Humidity": measurement.humidity,
"Battery": measurement.battery,
}
print(datetime.now().strftime("%Y-%m-%d %H:%M"), json.dumps(data, ensure_ascii=False))
# print("Battery voltage:", measurement.voltage, "V")
exit_event.set()
view raw mi_temp.py hosted with ❤ by GitHub

每 10 分钟获取一次温湿度信息,保存到 temp.log 文件中。如果每次获取失败次数超过 5 次,则退出程序。

1
*/10 * * * * cd /root/MiTemperature2 && /usr/bin/python3 mi_temp.py >> /root/MiTemperature2/temp.log

下面的脚本可以获取树莓派本身的温度信息,保存到 temp.log 文件中。可以进行对比

1
2
#!/bin/bash
echo `date +"%Y-%m-%d %H:%M"` `vcgencmd measure_temp` >> /home/pi/temp_save/temp.log

参考

[1] https://www.cnblogs.com/blueberry-mint/p/16575252.html

[2] https://github.com/JsBergbau/MiTemperature2

Notion 日历和苹果日历联动

需求描述

Notion 作为一个强大的笔记软件,吸引笔者使用的点在于跨平台,功能齐全。因此,在将 Notion 作为笔记软件使用的同时,也可以将其作为 TODO 事项管理软件使用。但是,移动端的 Notion 并没有实用的小组件视图。因此,结合之前的文章想到用 ics 文件来管理 Notion 的 TODO 事项。

数据获取

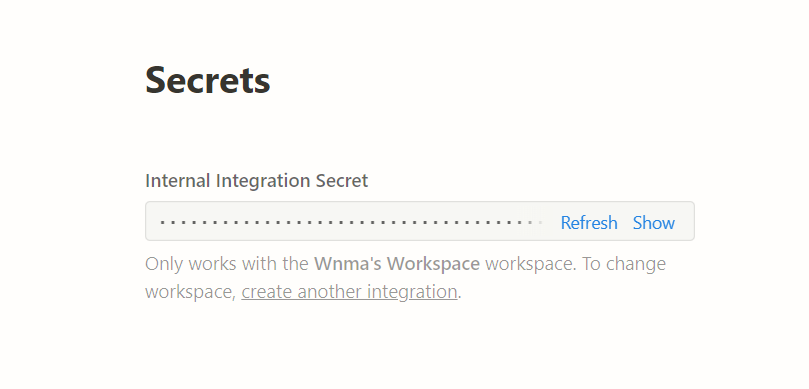
Notion 支持以 API 的方式获取 Page 的信息,尤其是当 Page 中主要以表格形式展示时,甚至可以用一系列过滤条件。首先,需要创建一个工具,以能够用 API 的方式获取 Notion 中的 Page 信息。https://www.notion.so/my-integrations,创建过程很简单,主要保存下 Secrets 即可。

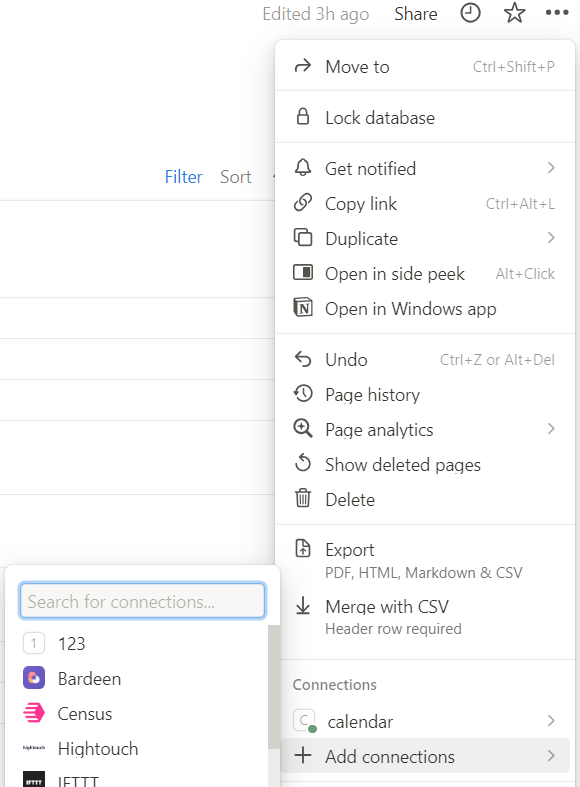
创建完成后,就可以在 Notion 的 Page 中 Add connections,如下图所示,可以把刚刚创建的工具,添加进来。比如这里是 123。

同时,保存 Page 页面的 url,比如 https://www.notion.so/AAA,访问页面时的 url,AAA 就是 dataset_id。至此,有两个信息,一个是 Secrets,一个是 dataset_id。将其粘贴至下面的 Python 代码中。

Python 的示例代码如下:

1
2
3
4
5
6
7
8
9
10
11
12
13
14
15
16
17
18
19
20
21
22
23
24
25
26
27
import requests
from datetime import datetime, timedelta, timezone

key = ...
dataset_id = ...
url = f"https://api.notion.com/v1/databases/{dataset_id}/query"


today = datetime(datetime.now().year, datetime.now().month, datetime.now().day)
yesterday = today - timedelta(days=1) # 计算前一天的时间

payload = {
"page_size": 100,
"filter": {}, # 增加一系列过滤条件,也可以事后用 Python 再过滤
}

headers = {
"accept": "application/json",
"Notion-Version": "2022-06-28",
"content-type": "application/json",
"Authorization": f"Bearer {key}",
}


if __name__ == "__main__":
response = requests.post(url, headers=headers, json=payload)
data_lst = response.json()["results"]

至此,Page 上的信息已经存到了 data_lst 中。

ics 文件生成

接下来,就是生成 ics 文件的生成。ics 文件的格式需要日程标题 summary、日程描述 description(可为空)、开始时间 dtstart、结束时间 dtend

1
2
3
4
5
6
7
8
9
10
11
12
13
14
15
16
17
18
19
20
21
22
23
24
from datetime import datetime, timedelta, timezone
from icalendar import Calendar, Event

if __name__ == '__main__':
cal = Calendar()
cal["version"] = "2.0"
cal["prodid"] = "-//ABC ICS//ZH"

for item in data_lst:
# 处理每条信息,将其转换为如下信息
summary = ...
description = ...
dtstart = ...
dtend = ...

event = Event()
event.add("summary", summary)
event.add("description", description)
event.add("dtstart", dtstart)
event.add("dtend", dtend)
cal.add_component(event)

with open("my.ics", "wb") as f:
f.write(cal.to_ical())

ics 部署

将生成的 ics 文件部署到服务器上,以便于服务器定期更新日程信息。同时,苹果可以订阅该 ics,以更新日程信息。

对于 tailscale 这一点而言,非常简单,只需要在服务器上运行如下命令即可。否则,需要使用域名 + nginx + https,这样才能将 ics 文件暴露出去,且苹果只接受 https 的 ics 文件。

1
tailscale funnel --bg https+insecure://localhost --set-path /ics /data/my.ics

另外,需要在服务器上,设置一个定时任务,定时运行上面的 python 脚本,以更新 notion 上的日程信息至 ics,最后苹果手机再接收到 ics 文件对日历进行更新。

苹果手机的订阅步骤如下:

设置 -> 日历 -> 账户 -> 添加账户 -> 其他 -> 添加已订阅的日历 -> 输入 ics 文件的 url 即可(比如这里应该是 https://A/ics)。这样就完成了所有的设置